Tuesday 29 January 2013

Sweetheart

The task for PRP this week is a Valentine's themed outfit.  The is an easy one for me since Maya loves pink, hearts, flowers, etc.  The hard part was that I totally mixed up my weeks and I finished my men's shirt outfit this past weekend!!  When I read the website Monday morning I just shook my head. Luckily I had already planned the Valentine's outfit and I had started cutting the fabric.  I stayed up a little later last night and got it all together.

I really didn't want to make something too over the top.  I wanted whatever I made to be useful on days other than Valentine's Day as well.  I think this outfit fits the bill!  The sweater is upcycled from an thin cotton/cashmere Jcrew sweater I have had for years. It had a slight hole in the side and it shrunk in the dryer so I wasn't getting much use out of it. I used an existing knit shirt to cut pieces out. I was able maintain the existing hem , sleeve hems and the bottom front of the neckline. For the back of the neck I made a facing out of a grey patterned bias tape.  I have it turned to the outside so it can be seen from the back. It serves to keep the neckline from stretching out too much as the top is worn.  I added a heart on the front made of polka dot knit fabric. 


 The pants are made from stretchy dark pink cord - with sparkles.  I was at the fabric store a while ago and - no joke- I though to myself "The perfect fabric for Maya would stretchy pink corduroy.  And if it had sparkles she would be in heaven."  And then I turned down an aisle and came face to face with the fabric I had just described in my head.  I had to buy some.  Luckily I had a coupon.  I cut the pants to be skinny jean/jegging type pants.  I used the Sleep Johns pattern from the book Growing Up Sew Liberated and they are a perfect fit.

Maya requested a picture in  this pose:


Saturday 26 January 2013

Tiny Tea Leaves x2


I bought the Tiny Tea Leaves cardigan pattern about a year and  half ago.  I decided to use the well-priced and durable Lion Wool-ease to make it since it was my first try with this pattern.  Plus, the kids grow so fast I thought a less expensive (and washable) yarn would be a good choice.  And the gauge worked out so I was excited.  Then life got in the way and my knitting pace really slowed down.  I did Hannah's first because it is a smaller size and I thought getting through the first one more quickly would motivate me.  I finished it this past summer and I cast on Maya's.  Then I really stalled.  Sewing was so much more rewarding because I could finish a project in an evening or two!  This fall I made myself do a little every week.  I finally finished!!  I love the finished products and the girls do too.  Maya's looks like it will last a while but I think Hannah will only be able to wear hers this winter.  Do I dare cast on another?  I have the adult pattern as well and some VERY nice yarn to go with it.  I think I might try that next.


Monday 21 January 2013

Sensory Smart Superstar

Sewing for Sam is something I have agonized over in previous posts.  First of all, sewing for boys can be more difficult, at least when you are just starting out.  You can't just whip up a simple skirt for your guy to try out your machine (well, of course you CAN, and I certainly wouldn't judge - but Sam isn't interested).  In addition, Sam is PROFOUNDLY autistic.  He is essentially non-verbal, he has major behavior issues, he has severe cognitive impairment (my youngest sailed past him cognitively at about 15 months), and he has sensory issues. The cognitive and sensory issues limit our clothing options.

I really haven't made him anything he will wear until now (I explained the pj fiasco in a previous post).  So when I saw that the 3rd week on Project Run and Play requires making an outfit for a boy, I considered skipping this one.  But then I decided to think hard about what might work and gave it a go.  I am very pleased with the results!!!


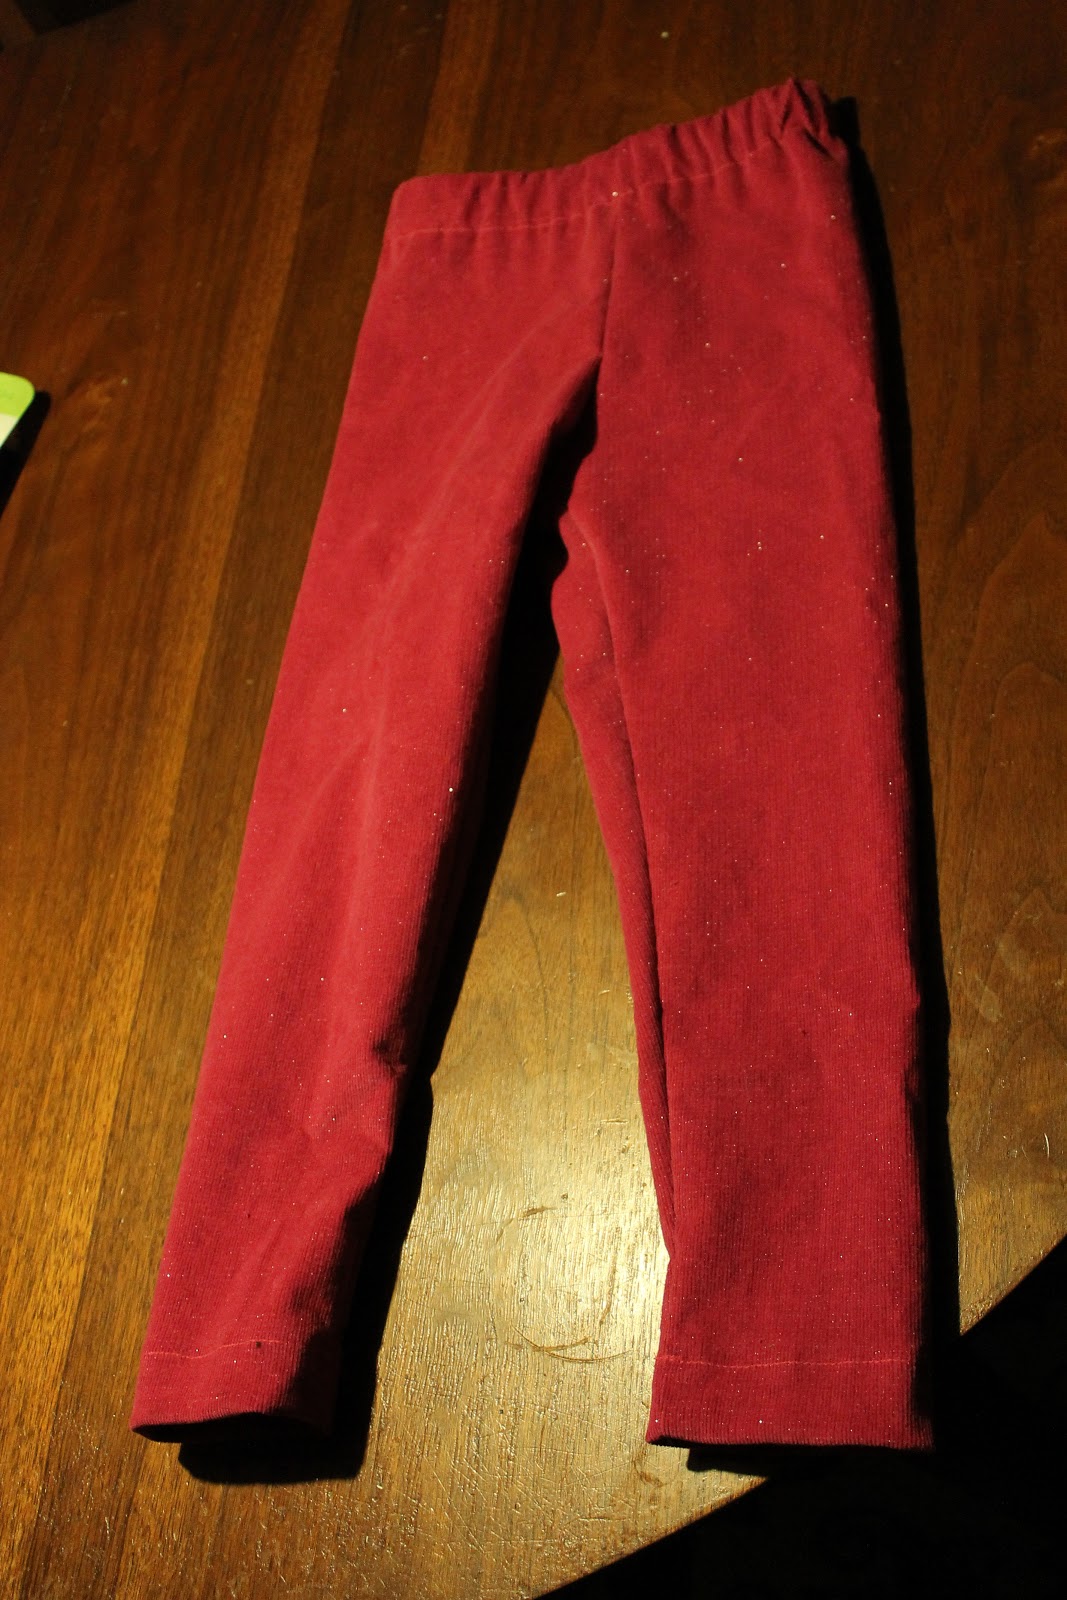
For the pants, I started with the Oliver and S Bedtime Story pajama pants.  The fabric is a dark olive fine-wale cord.  Sam can only wear elastic waist pants because he cannot do buttons, zippers or drawstrings.  I trimmed about 1/2 inch off the top of the pants and then I made the attached waistband wider (I used 2 inch elastic).  I made the waistband out of a lighter olive green quilting cotton which was leftover from the Party Dress Remix I made in week one.  I added a row of stitches around the top of the elastic to prevent the elastic shifting.  I left off the leg bindings in that pattern and just made sure the pants were long enough to hem properly.  I added a cargo pocket on one leg just for the look of it.  Sam doesn't use pockets.


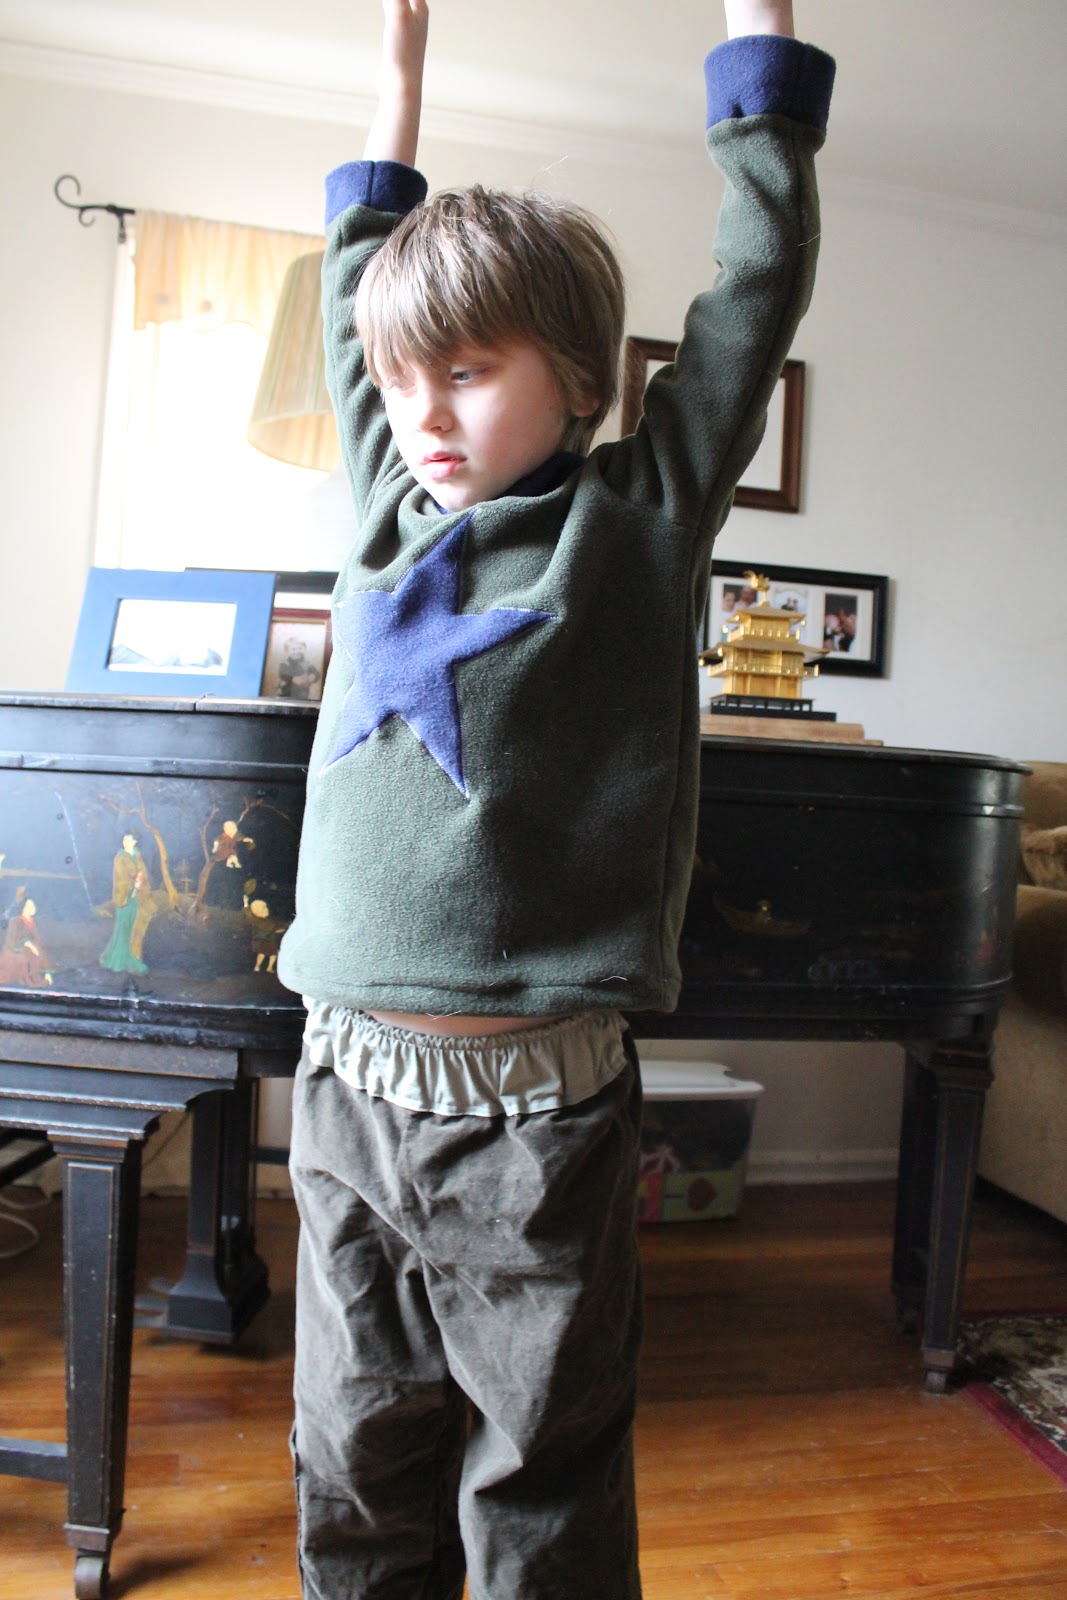
Sam doesn't like stiff collars and he isn't wild about shirts made with woven fabric so for the top I stared with the Flashback Skinny Tee pattern (designed for stretchy fabric). I sized up so it would be loose enough to wear over a tee or undershirt and I used a shirt he already has to adjust the sleeve length.  I used a light to mid weight fleece.  I wanted to add something interesting to the front.  Sam doesn't have any hobbies for me to pull and image from.  His only "activity" is throwing things around the house and jumping up and down and that doesn't really lend itself to a clothing theme!  I decided a simple shape like a star would be a nice touch.  I printed out a star from Microsoft Word and cut out it out of navy blue fabric - the same as what I was using for the cuffs and the neck.  I sewed the star onto the front piece before assembling the shirt.  I made a mock turtle neck for warmth (a full turtleneck would drive him nuts).

The big test was when Sam had to put everything on.  He can't tolerate being measured so I was using his other clothes to figure out measurements.  My big fears were that he would reject the outfit for some reason or the fit would be off.  But. . . .SUCCESS

Then I had to get him to take pictures.  I bribed him with candy (by the way, in the world of Autism, it isn't candy, it is a "reinforcer".  That makes it better, right?)  I was able to get a few shots but most were like the one above - hand flapping, jumping up and down, and generally being spastic.


Poking at the window:

I got him to show the waistband:


Then I called it quits and let him run off. 


Monday 14 January 2013

Fuzzy Dots

The task this week was to make something with stripes and polka dots.  I wasn't sure whether it had to be stripes AND dots or just one.  I knew somewhere in all this I wanted to make Maya some pants.  I make her skirts and dresses more than anything else so I thought pants would be a nice change.  Also, she is small for her age and kind of in between sizes so custom pants are just right for her.  I drafted the pattern from pants that fit her width but are a little short (she is between a 3T and a 4T in pants).  I was using stretchy fleece so I made sure to trace pants with a similar stretch.

I cut a variety of dots out of the pink.  I am not sure why I thought it was important to make my own dots.  I actually have some polka dot fabric in my stash I could have used for a different design but this felt more creative. 

I used a wide zig-zag stitch to attach the dots in random spots.  If you try this, make sure to turn your work slowly to keep the stitches even and the circle well-rounded.   I love the way they look. 

Then I assembled the pants.  I usually assemble each leg and then put one inside the other.  I used my serger but this can be done on a sewing machine. 


We had some warmer weather this weekend so we headed outside to take a few pictures. This is what she did when she saw the camera.  Ham?


Warm enough to swing?


Dots on the back, too.


I made a stripe on a piece of fleece using light pink fleece binding.  Maya loves the look but the clip I used would have stayed in a whole lot better if she would have let me put her hair in a pony tail!

Tuesday 8 January 2013

A Casual Party Dress


I decided to sew along with Project Run and Play this season.  I am pretty sure I will end up missing a week along the way since I am also working full time but I will do my best!  The first project is a remix of a Party Dress.  I read this tutorial a few times to get a feel for the pattern/dress.  It seemed to me the essential elements were the large buttons/loop closures, the wide sash with the pleat (the pleat is one of my favorite design elements on this dress) and the color block border on the skirt.  I knew a super fancy dress would just get stuck in the back of a closet so I decided to make a scaled down version of this dress. 

Here are the details:
-The main fabric is a Valorie Wells quilting cotton and the other fabric is a solid broadcloth.

-I kept the bodice the same as the original pattern. 

-I cut down on the volume of the skirt significantly.  I used a piece about 43 inches wide and so I just had one seam up the back.

-I used solid bias tape to make the button loops.  I happened to have a perfect match in my stash so it worked well.

- I added a patch pocket.

-I made the sash with BOTH fabrics.  I wanted to be able to see both kind of "swirl" in the loops of the bow.

-I shortened the sash .  I am hoping this will be a dress Maya can wear to church (or maybe even school since Maya loves to be fancy) on a regular basis and I had visions of a long sash getting stuck in doors or dipping in the toilet.  I kept the pleats at the side and I love the way they look.

-I didn't use fabric covered buttons.  I found really pretty pink buttons made from recycled plastic which matched perfectly.


Maya was a little annoyed with me when she saw that the buttons and the bow went on the back.  Since she can't really see them that way, she thinks it is pointless.  She got over it enough to take pictures!  Lesson learned though - bow in the front next time.


One final pose: